3. Fix one side and Symmetrize
片側だけを修正し、Symmetrize で UV マップを左右対称にする。

0.

白黒のチェッカーを表示してUV マップが均一に広がっているか確認します。
図のようにチェッカーのアイコンをクリックし、表示します。
1.

The texture is stretched on the side of the shirt.
I am going to fix by moving the UV points.
ボディーの横の部分のUV マップが伸びているので、UV ポイントを移動し調整してみます。

Symmetry X option does not work well for UV Editor, so turn off Symmetry.
I am going to fix only one side, then I will apply Symmertize later.
左右対称にするオプション Object X がUV マップには使えないので、Symmetry は Off に設定します。
片側だけを修正し、最後に Symmetrize で左右対称にします。
2.

Move the UV points adn fix the stretched area.
UV ポイントを移動し、伸びた部分を修正します。
3.

Move the UV point.
UV ポイントを移動します。
4.
 Move the shoulder UV points.
肩の部分も移動します。
5.

I am going to hide the other parts. Go to UV Shell.
他の部分を非表示にしてみます。
右ボタンで UV Shell を選択します。
6.

Click the front part.
服の前側のパーツを選択します。
7.

Click Isolate Select icon.
Isolate アイコンで他のパーツを非表示にします。
8.

To hide the other parts in UV Editor, click Isolate Select icon.
UV Editor で他のパーツを非表示にする方法は、上の図のようにアイコンをクリックします。
9.

I fixed only the right side, now I am going to fix the left side using Symmertize.
First, Move to the texture space area.
Symmetrize で左右対称にしてみます。
まずオブジェクトをテクスチャー スペースの中心に移動します。
10.

I am going to move the pivot on the center on the shirt.
Hid D to move the pivot.
キーボード D で軸をオブジェクトの中心に移動してみます。
11.

Turn on snap tool.
スナップ ツールをオンにします。
12.
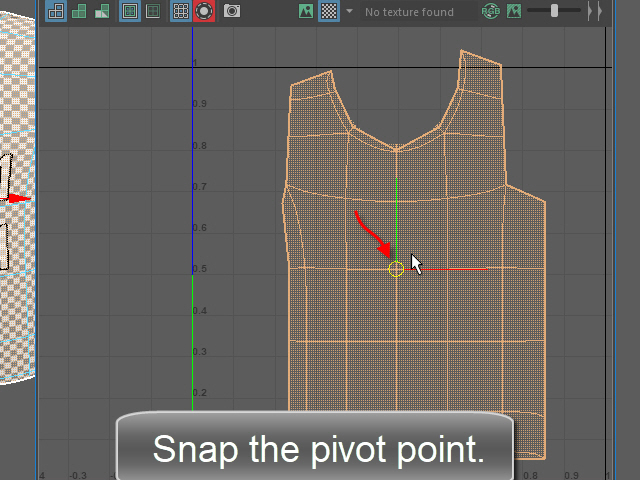
Snap the pivot on the center of the shirt.
の中心のバーテックスにスナップします。
13.

Hit D to go back to Move tool.
キーボード D を押して元の状態に戻します。
14.

Turn on Snap to Grid and move the object to the center line.
次に、Snap to Grid のアイコンをオンにして、座標の中心にスナップします。
15.

Now I am ready to apply Symmetrize.
First, select the right side UVs.
Symmtrize で左右対称にしてみます。
まず修正した側の UV ポイントをセレクトします。
16.

Next, click Symmetrize button.
次にSymmetrize をクリックします。
17.

Then, Click the center edge.
最後に中央のエッジをクリックします。
18.

Now the object is symmetric.
このように左右対称になります。
19.

Turn off Isolate Select.
Isolate Select を解除します。
20.

Turn off Isolate Select.
Isolate Select を解除します。
21.

Now, select the UV shell from the back side of the shirt.
次に背中側のパーツを修正してみます。
UV shell をセレクトします。
22.

Click the second icon from the left.
The red surface is reversed surface. It needs to be fixed.
左から二番目のアイコンで面の裏表を確認します。
赤い面の場合は裏面が表示されています。
これは反転して修正する必要があります。
23.

Flip U direction.
Flip U で反転します。
24.

Move the UVs and fix the stretched texture.
Just fix the one side. The other side can be fixed by applying Symmetrize.
UV ポイントを移動し、伸びたUV マップを修正します。
25.

Fix the shoulder area.
肩の部分も修正します。
26.

Move to the texture space.
背中のパーツを中心に移動します。
27.

Snap the pivot to the center of the shirt.
軸をパーツの中心にスナップします。
28.

Snap the shirt on the center line.
パーツを座標軸にスナップします。
29.

Now, I am ready to apply Symmetrize.
Select the right side of UVs.
修正した側の UV マップをセレクトし、
30.

Next, Apply Symmetrize.
Symmetrize で反転します。
31.

Then, Click the center edge.
最後に中心のエッジをセレクトすると左右対称になります。